

Posted by Spellbinders Team
on November 13, 2019

Hello Crafty Friends! Yasmin here, today I’m honored to be back over here at Spellbinder Blog. So, in today’s post, I’ll be sharing a step by step with you how I’ve created these three greeting cards featuring the new November 2019 Die D-Lites Collection. With that being said, please keep on reading below.
 As, for the focal point, I used the beautiful Die D-Lites Tallulah Etched Dies for the die-cutting, I used the Assorted Colored Card Stock pack so, first I ran through the Die-cut Machine a piece of Cream Color card stock along with the head die from the set next, I die-cut out of Bright Pink, Light Pink, Dark Purple, Light Purple, Dark Green & Light Green the leaves and flowers from the set. Then, I die-cut the head once again but, this time out Brown card stock as, I wanted just the shadows that create the contour of the face. Lastly, I die-cut the details of the head as you can see, I die-cut the eyelashes twice out of Black card stock the cheeks out of the same Cream card stock and the lip and tie out the Bright Pink card stock.
To assemble the head, first I curled up each of the flowers using the Tool N’ One with the Stylus Tips then, I adhered them by interchanging their colors one bright one dark as shown. Second, I added a bit of shadowing to the head and cheeks by inking them up with Tattered Rose Distress Oxide Ink Pad. Once, those steps were done, I added piece of double-sided tape on the backing of the head so, I could have the exposing adhesive in the front to inlay the nose, eyebrow, chin, jawline and beauty mark. Once, they were inlay in the head, I peeled the back of the double-sided tape and I adhered the head to the card followed by the flowers and leaves which, some of them I adhered with liquid glue and others with pieces of foam mounting tape to create dimension. Finally, to finish the card off, I adhered the mouth, lips, cheeks, tie and the second pair of eyelashes to the head as well as, the sentiment that, I white heat embossed on a piece of green card stock. As, a final touch, I decided to add a mix of jewels to the center of the flowers for an extra touch of sparkle.
As, for the focal point, I used the beautiful Die D-Lites Tallulah Etched Dies for the die-cutting, I used the Assorted Colored Card Stock pack so, first I ran through the Die-cut Machine a piece of Cream Color card stock along with the head die from the set next, I die-cut out of Bright Pink, Light Pink, Dark Purple, Light Purple, Dark Green & Light Green the leaves and flowers from the set. Then, I die-cut the head once again but, this time out Brown card stock as, I wanted just the shadows that create the contour of the face. Lastly, I die-cut the details of the head as you can see, I die-cut the eyelashes twice out of Black card stock the cheeks out of the same Cream card stock and the lip and tie out the Bright Pink card stock.
To assemble the head, first I curled up each of the flowers using the Tool N’ One with the Stylus Tips then, I adhered them by interchanging their colors one bright one dark as shown. Second, I added a bit of shadowing to the head and cheeks by inking them up with Tattered Rose Distress Oxide Ink Pad. Once, those steps were done, I added piece of double-sided tape on the backing of the head so, I could have the exposing adhesive in the front to inlay the nose, eyebrow, chin, jawline and beauty mark. Once, they were inlay in the head, I peeled the back of the double-sided tape and I adhered the head to the card followed by the flowers and leaves which, some of them I adhered with liquid glue and others with pieces of foam mounting tape to create dimension. Finally, to finish the card off, I adhered the mouth, lips, cheeks, tie and the second pair of eyelashes to the head as well as, the sentiment that, I white heat embossed on a piece of green card stock. As, a final touch, I decided to add a mix of jewels to the center of the flowers for an extra touch of sparkle.
 As, for the HI letters I die-cut them 2X once out of gold card stock and the second time out of fun foam. Once, all die-cuttings were done, I adhered the leaves and flowers following the frame details with liquid glue then, I adhered the backing of the gold letters with liquid glue to the fun foam and last but not least, I adhered the backing of the fun foam letters to the frame. Right after when the frame was completed, I set it aside while I created the card panel and the card base for this card. So, for the card panel I trimmed a piece of white card stock that measured 4X4 then I used my score board and bone folder tool to score each 1/8’’in from the score board to create the texture on the card panel so, as soon as the score lines were done, I adhered the card panel to a top folding white square base with foam mounting tape. Lastly, to finish the card off I adhered the backing of the frame to the card as well as a mix of jewels which, I adhered here and there for a sparkly look.
 Second; I adhered each side of the frame with liquid glue to a white square card panel. Lastly, I die-cut out of gold card stock 4 butterfly and some flowers out color card stock which, right afterwards I adhered to the frame as shown above. To finish the card off, I gold heat embossed a sentiment right in the center of the card panel and, I adhered the backing of the card panel to a white square top folding card base with foam mounting tape and to add sparkle, I adhered jewels to the flowers and butterflies.
Well friends, I hope that you’ve enjoyed learning about how, I created these cards! The new November 2019 Die D-Lites Collection is available now. Be sure to tag us in your social media using #Spellbinders #NeverStopMaking hashtags when sharing your creations so, we can see what you are creating with this beautiful collection. With that being said, thank you so much for stopping by today, we hope to see you soon. But, for now…have a fabulous crafty day!
You've Been On My Mind Card
To begin with, I created the background for the first example. To create the detailed texture for the background, I used the new Die D-Lites Kaleidoscope Triangles Etched Dies, this die has 3 layering dies so, I die-cut each of the layers 12X out of white card stock. Once, all triangles were cut out the white card stock, I stacked the 3 layers for each triangle to create the stunning dimensional motif. Right after, when all the triangles were ready, I adhered them to an A2 size white card panel creating the pattern that you see above. Lastly, I trimmed the edges of the pattern, and I adhered the backing of the card panel with double-sided tape to an A2 top folding white card base which, I set aside while I created the focal point for this card.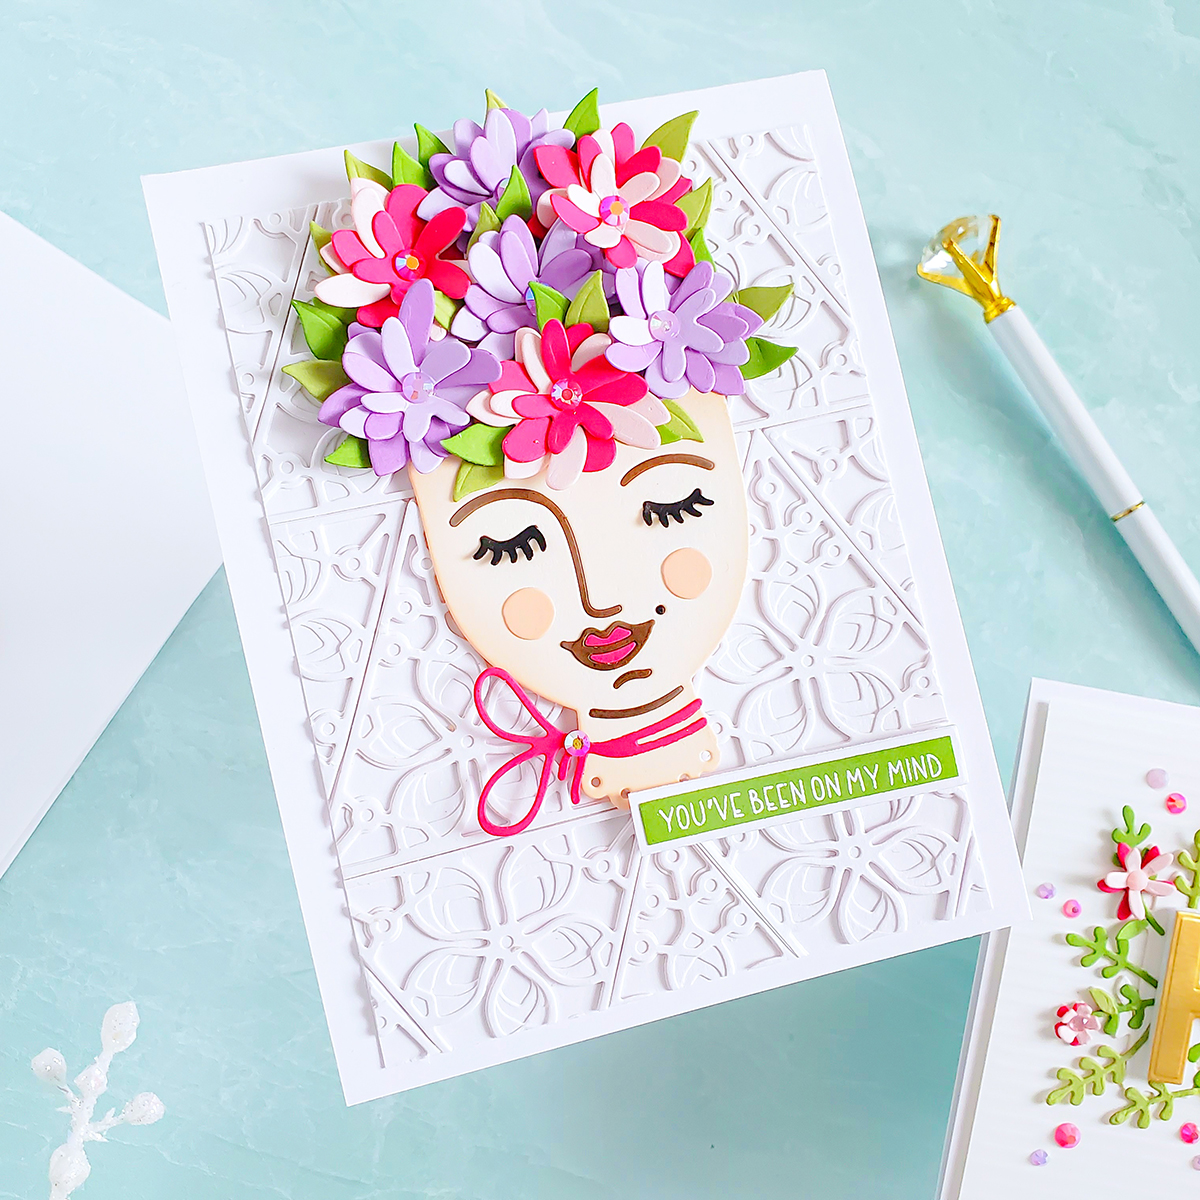 As, for the focal point, I used the beautiful Die D-Lites Tallulah Etched Dies for the die-cutting, I used the Assorted Colored Card Stock pack so, first I ran through the Die-cut Machine a piece of Cream Color card stock along with the head die from the set next, I die-cut out of Bright Pink, Light Pink, Dark Purple, Light Purple, Dark Green & Light Green the leaves and flowers from the set. Then, I die-cut the head once again but, this time out Brown card stock as, I wanted just the shadows that create the contour of the face. Lastly, I die-cut the details of the head as you can see, I die-cut the eyelashes twice out of Black card stock the cheeks out of the same Cream card stock and the lip and tie out the Bright Pink card stock.
To assemble the head, first I curled up each of the flowers using the Tool N’ One with the Stylus Tips then, I adhered them by interchanging their colors one bright one dark as shown. Second, I added a bit of shadowing to the head and cheeks by inking them up with Tattered Rose Distress Oxide Ink Pad. Once, those steps were done, I added piece of double-sided tape on the backing of the head so, I could have the exposing adhesive in the front to inlay the nose, eyebrow, chin, jawline and beauty mark. Once, they were inlay in the head, I peeled the back of the double-sided tape and I adhered the head to the card followed by the flowers and leaves which, some of them I adhered with liquid glue and others with pieces of foam mounting tape to create dimension. Finally, to finish the card off, I adhered the mouth, lips, cheeks, tie and the second pair of eyelashes to the head as well as, the sentiment that, I white heat embossed on a piece of green card stock. As, a final touch, I decided to add a mix of jewels to the center of the flowers for an extra touch of sparkle.
As, for the focal point, I used the beautiful Die D-Lites Tallulah Etched Dies for the die-cutting, I used the Assorted Colored Card Stock pack so, first I ran through the Die-cut Machine a piece of Cream Color card stock along with the head die from the set next, I die-cut out of Bright Pink, Light Pink, Dark Purple, Light Purple, Dark Green & Light Green the leaves and flowers from the set. Then, I die-cut the head once again but, this time out Brown card stock as, I wanted just the shadows that create the contour of the face. Lastly, I die-cut the details of the head as you can see, I die-cut the eyelashes twice out of Black card stock the cheeks out of the same Cream card stock and the lip and tie out the Bright Pink card stock.
To assemble the head, first I curled up each of the flowers using the Tool N’ One with the Stylus Tips then, I adhered them by interchanging their colors one bright one dark as shown. Second, I added a bit of shadowing to the head and cheeks by inking them up with Tattered Rose Distress Oxide Ink Pad. Once, those steps were done, I added piece of double-sided tape on the backing of the head so, I could have the exposing adhesive in the front to inlay the nose, eyebrow, chin, jawline and beauty mark. Once, they were inlay in the head, I peeled the back of the double-sided tape and I adhered the head to the card followed by the flowers and leaves which, some of them I adhered with liquid glue and others with pieces of foam mounting tape to create dimension. Finally, to finish the card off, I adhered the mouth, lips, cheeks, tie and the second pair of eyelashes to the head as well as, the sentiment that, I white heat embossed on a piece of green card stock. As, a final touch, I decided to add a mix of jewels to the center of the flowers for an extra touch of sparkle.
Floral Hi Card
For the second example, I create a square card using the Die D-Lites Floral Hi Etched Dies from this collection. So, to begin with I ran thought the die-cut machine the HI Frame die from the set to die-cut it out of white card stock. Next, I ran though the die-cut machine the greenery dies to die-cut the leaves out light and dark green card stock same as, the flowers die which, I die-cut them out light and dark pink card stock. As, for the HI letters I die-cut them 2X once out of gold card stock and the second time out of fun foam. Once, all die-cuttings were done, I adhered the leaves and flowers following the frame details with liquid glue then, I adhered the backing of the gold letters with liquid glue to the fun foam and last but not least, I adhered the backing of the fun foam letters to the frame. Right after when the frame was completed, I set it aside while I created the card panel and the card base for this card. So, for the card panel I trimmed a piece of white card stock that measured 4X4 then I used my score board and bone folder tool to score each 1/8’’in from the score board to create the texture on the card panel so, as soon as the score lines were done, I adhered the card panel to a top folding white square base with foam mounting tape. Lastly, to finish the card off I adhered the backing of the frame to the card as well as a mix of jewels which, I adhered here and there for a sparkly look.
Butterfly Frame Card
For the third and last card, I used the Die D-Lites Butterfly Frame-A-Long Etched Dies so, to begin with I started by running through the die-cut machine the butterfly frame to die-cut it 8X out of white card stock and, 4X out of gold card stock. Once, the die-cutting were done, first; I stacked two whites die-cuttings and one gold for each side of the frame. Second; I adhered each side of the frame with liquid glue to a white square card panel. Lastly, I die-cut out of gold card stock 4 butterfly and some flowers out color card stock which, right afterwards I adhered to the frame as shown above. To finish the card off, I gold heat embossed a sentiment right in the center of the card panel and, I adhered the backing of the card panel to a white square top folding card base with foam mounting tape and to add sparkle, I adhered jewels to the flowers and butterflies.
























































































2 comments
These are beautiful !
Would love to see a video on how you made each of these.