


Posted by Spellbinders Team
on August 26, 2022

Hello crafty friends! It’s Rachel Alvarado from RachelAlvaradoDesigns.com and @theunpamperedstamper. I’m thrilled to share with you some fun projects featuring items from the new Gnome for Christmas Collection. I love to make a variety of cards with lots of color and/or 3D elements and am always looking for ways to stretch the use of my stamps and dies.


3D Shadow Box
For my first project, I created a 3D Shadow Box Card showcasing the Holly Jolly Gnome Etched Die Set combined with the Big Holiday Words Clear Stamp & Die Set.
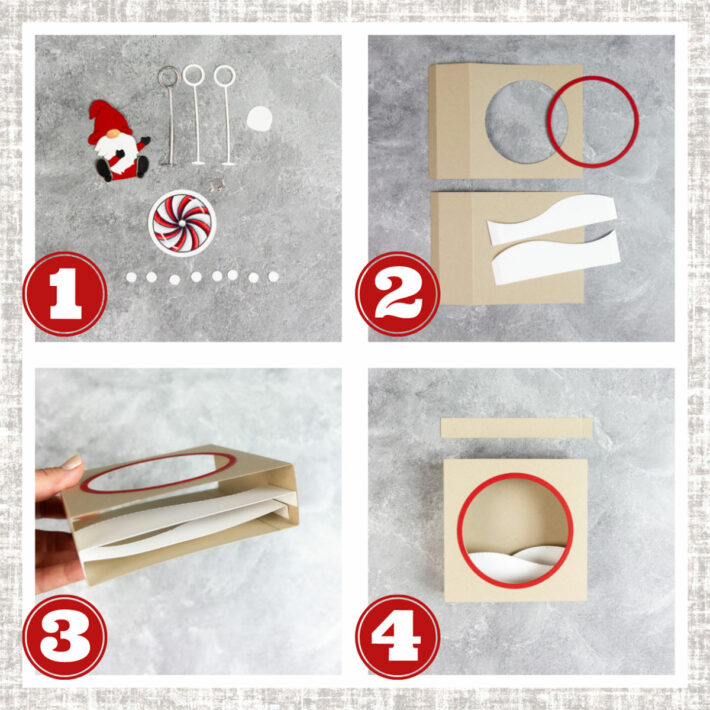
- Die cut and assemble gnome, 3 pieces of the ornament “string” to glue together for sturdiness, and 1 extra gnome body piece (a white piece in the top right of photo #1).
- Stamp the peppermint ornament from the Big Holiday Words Stamp Set, color it, and cut it out with a circle die (or use the circular ornament that comes with the Holly Jolly Gnome Set instead).
- Hole punch 8 small circles from 100lb card stock and glue them together
- Trim two pieces of card stock to 7” wide x 5” tall and score them both at ½” and 2”. Die cut a circle (or whatever shaped opening you like) in the center of one of them.
- Create 2 snow drifts that are 5 ¾” long and score tabs at 3/8” from each end (along the 7” side) to form tabs.
- Adhere snow drifts to the inside bottom of the shadow box making sure that they are staggered.
- Create a circle frame using nested circle dies. Trim a strip of card stock to 5 ¾” x ½” and score at 3/8” from each end of the 5 ¾” side to form tabs.


- Add a small strip to the top of the box card
- Adhere the group of punched hole pieces that you had glued together in step 1 onto the center of the top strip
- Place the loop of the ornament “string” over top of the circular disc that you had created
- Adhere the extra gnome body piece to the top of the circular disk with liquid adhesive – locking in the swinging string mechanism.

Watch this card in action: Gnome for Christmas with Rachel Alvarado - 3D Cardmaking & Coloring
Gnome Tree Card
For my second project, I created a fun gnome tree using both the Gnome Tree Etched Dies along with the gorgeous Twilight Sparkle Strip Glimmer Hot Foil Plate. To start, I die cut my gnome tree base from some Snowdrift Card Stock. I then die-cut the gnome pieces from some Neenah Solar White 110lb Card Stock and colored each piece with Copic Markers.

JOY-filled card
For my last project, I combined the Holly Jolly Gnome Etched Die Set along with the Big Holiday Words Clear Stamp & Die Set to create a fun “JOY”-filled card. I used a 4.25” x 5.5” piece of Blue Spruce Card Stock for my card base and layered it with a 3.75” x 5” piece of white card stock. I then trimmed another piece of white card stock to 3 5/8” x 4 7/8” and lightly blended the sky area with some Evergreen and Pine Needles Distress Oxide Inks.

Spellbinders Supplies:

Other Supplies
Evergreen Distress Oxide Ink, Adhesive Foam Tape, Copic Markers, Neenah Solar White 110lb Card Stock, Liquid Adhesive Glue, Standard Hole Punch.
























































































2 comments
Hi Ronda! I sincerely apologize for the delay in my response! I just saw your question today. I actually didn’t use any string. It simply hangs from a diecut (the die is included in the Holly Jolly Gnome Etched Dies Set). I simply die cut it 3x’s for extra stability. I hope that helps to answer your question! :0)
hello. I am curious about where to get the pendulum ornament string.
Thank you
Ronda Powell.