


Posted by Spellbinders Team
on August 25, 2017

The party planner gal that I am had to do something for my oldest daughter's birthday (even though she is in her 30’s), so I bought these super cool plates, napkins and cups and began planning, designing and making. It wasn’t long before I had a plethora of DIY projects to go with the initial decor. The best part was that they all had the same key component, namely the watermelon, featured throughout the tablescape. I would love to show you how you can make these creations so that you can custom design what fits best for your party occasion.
 Let’s start with how I made the watermelon and slice.
1. Die-cut the core of the watermelon and slice from solid cardstock.
2. Die-cut the rind from aqua green cardstock and gold poster board.
3. Die-cut the watermelon seeds from gold poster board.
Let’s start with how I made the watermelon and slice.
1. Die-cut the core of the watermelon and slice from solid cardstock.
2. Die-cut the rind from aqua green cardstock and gold poster board.
3. Die-cut the watermelon seeds from gold poster board.
 4. Attach aqua-green rind to pink core.
5. Adhere gold rind to underneath side of rind so that the gold barely shows.
6. Adhere watermelon seeds to core.
4. Attach aqua-green rind to pink core.
5. Adhere gold rind to underneath side of rind so that the gold barely shows.
6. Adhere watermelon seeds to core.
 7. Do the same steps for the slice.
“Sweet” Birthday Card
7. Do the same steps for the slice.
“Sweet” Birthday Card
 I love watercoloring and this card is as basic as it gets.
1. Cut a mat of hot pink cardstock 5” x 3 ¾” and a piece of watercolor paper that is 4 ½” x 3 ¼”.
I love watercoloring and this card is as basic as it gets.
1. Cut a mat of hot pink cardstock 5” x 3 ¾” and a piece of watercolor paper that is 4 ½” x 3 ¼”.
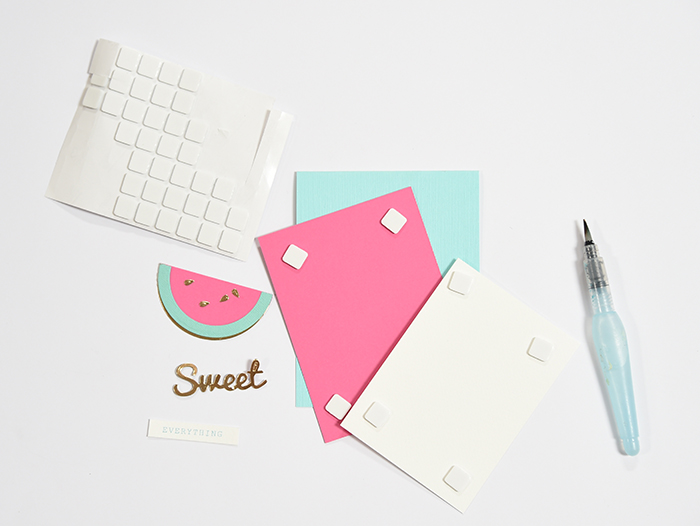 2. Assemble the card by matting the watercolor paper on top of the hot pink paper using foam dots and then place the hot pink paper on top of the aqua-green card base. The size of my aqua-green card base is 4 ¼” X 5 ½”.
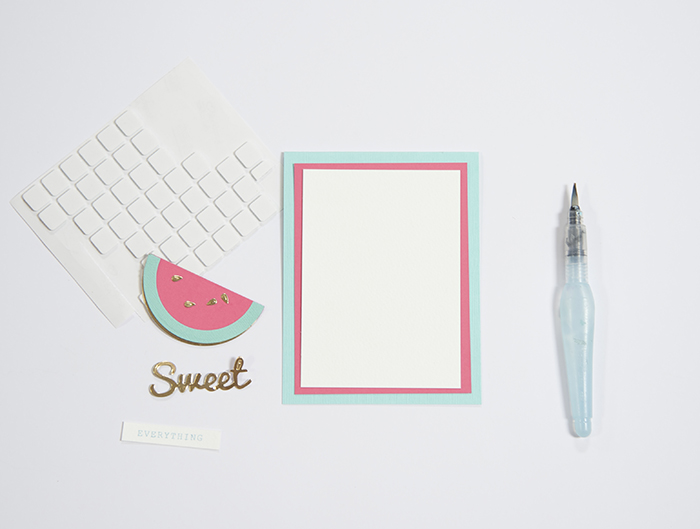 3. Dip a water brush into the aqua paint and lightly brush color onto paper. Allow to dry.
 4. Die-cut the sentiment “Sweet” from gold paper and adhere to card.
5. Stamp sentiment in aqua ink onto watercolor paper. Trim and adhere to card using foam dots.
4. Die-cut the sentiment “Sweet” from gold paper and adhere to card.
5. Stamp sentiment in aqua ink onto watercolor paper. Trim and adhere to card using foam dots.
 6. Adhere embellished watermelon and slice.
 Watermelon Bag
 1. Die-cut two bags from pink cardstock and a small strip for handle.
 2. Adhere bags together at side as shown. Fold where indicated.
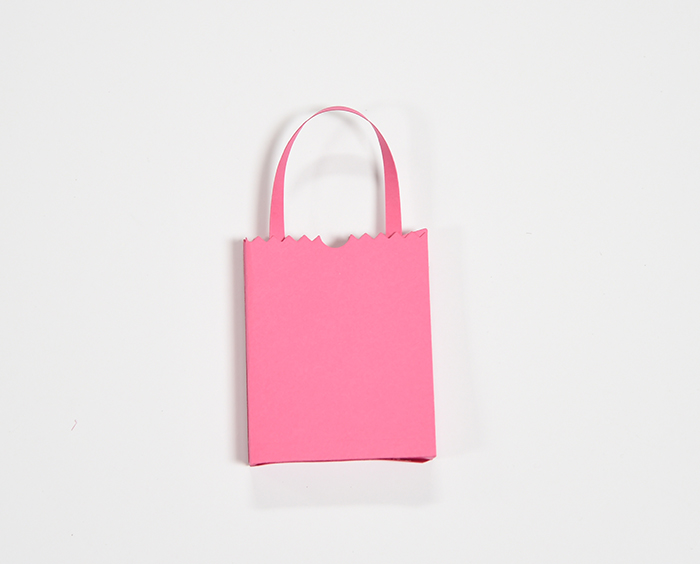 3. Attach handle to inside of bag with adhesive.
4. Stamp a sentiment.
5. Attach watermelon to bag with adhesive.
6. Attach sentiment onto bag with clothespin.
3. Attach handle to inside of bag with adhesive.
4. Stamp a sentiment.
5. Attach watermelon to bag with adhesive.
6. Attach sentiment onto bag with clothespin.
 Pillow Box
 1. Die-cut two pillow boxes from cardstock and sentiment from gold paper.
 2. Adhere together at sides.
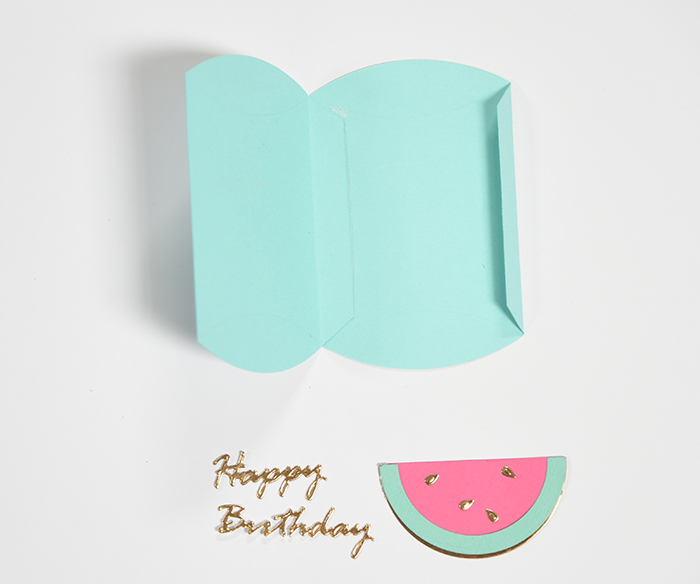 3. Fold up as indicated.
 4. Attach watermelon to top of box and adhere sentiment to bottom of box.
 Cupcake Topper
 1. Adhere gold pom-pom to toothpick.
 2. Attach watermelon slice to toothpick.
 3. Insert into cupcake.
***If you really want to make it all DIY, create a banner by die-cutting various sizes of circles from gold poster board and adhering them to a long piece of twine. Sups cute!***
3. Insert into cupcake.
***If you really want to make it all DIY, create a banner by die-cutting various sizes of circles from gold poster board and adhering them to a long piece of twine. Sups cute!***
 Supplies for All Projects:
PL-001 Platinum Die Cutting and Embossing Machine or PE-100 Platinum 6 Machine
Spellbinder Dies:
S4-721 Market Fresh I’ll Have a Slice Etched Dies
S4-563 Shapeabilities Simply Said Phrase Set One Etched Dies
S4-114 Nestabilities Standard Circles Lg Etched Dies
SR-009 Contour Pillow Box Steel Rule Die
S4-728 Shapeabilities Market Fresh Bag n Tag It Etched Dies
Cardstock of Your Choice
Gold Poster Board
Adhesive of Your Choice
Foam Dots
Gold Pom-Pom Ball
Hot Glue and Glue Gun
Ink-Aqua
Mini Clothespin
Stamp Sentiment-Small
Toothpick
Water Brush
Watercolor Paint-Aqua
Watercolor Paper-140 lb. Cold Press
Thanks for joining me for this new series. Hope you will stop by again next month when I feature a baby shower theme!
XO,
Debi
Supplies for All Projects:
PL-001 Platinum Die Cutting and Embossing Machine or PE-100 Platinum 6 Machine
Spellbinder Dies:
S4-721 Market Fresh I’ll Have a Slice Etched Dies
S4-563 Shapeabilities Simply Said Phrase Set One Etched Dies
S4-114 Nestabilities Standard Circles Lg Etched Dies
SR-009 Contour Pillow Box Steel Rule Die
S4-728 Shapeabilities Market Fresh Bag n Tag It Etched Dies
Cardstock of Your Choice
Gold Poster Board
Adhesive of Your Choice
Foam Dots
Gold Pom-Pom Ball
Hot Glue and Glue Gun
Ink-Aqua
Mini Clothespin
Stamp Sentiment-Small
Toothpick
Water Brush
Watercolor Paint-Aqua
Watercolor Paper-140 lb. Cold Press
Thanks for joining me for this new series. Hope you will stop by again next month when I feature a baby shower theme!
XO,
Debi
Let’s start with how I made the watermelon and slice.
1. Die-cut the core of the watermelon and slice from solid cardstock.
2. Die-cut the rind from aqua green cardstock and gold poster board.
3. Die-cut the watermelon seeds from gold poster board.
4. Attach aqua-green rind to pink core.
5. Adhere gold rind to underneath side of rind so that the gold barely shows.
6. Adhere watermelon seeds to core.
7. Do the same steps for the slice.
“Sweet” Birthday Card
I love watercoloring and this card is as basic as it gets.
1. Cut a mat of hot pink cardstock 5” x 3 ¾” and a piece of watercolor paper that is 4 ½” x 3 ¼”.
2. Assemble the card by matting the watercolor paper on top of the hot pink paper using foam dots and then place the hot pink paper on top of the aqua-green card base. The size of my aqua-green card base is 4 ¼” X 5 ½”.
3. Dip a water brush into the aqua paint and lightly brush color onto paper. Allow to dry.
4. Die-cut the sentiment “Sweet” from gold paper and adhere to card.
5. Stamp sentiment in aqua ink onto watercolor paper. Trim and adhere to card using foam dots.
6. Adhere embellished watermelon and slice.
Watermelon Bag
1. Die-cut two bags from pink cardstock and a small strip for handle.
2. Adhere bags together at side as shown. Fold where indicated.
3. Attach handle to inside of bag with adhesive.
4. Stamp a sentiment.
5. Attach watermelon to bag with adhesive.
6. Attach sentiment onto bag with clothespin.
Pillow Box
1. Die-cut two pillow boxes from cardstock and sentiment from gold paper.
2. Adhere together at sides.
3. Fold up as indicated.
4. Attach watermelon to top of box and adhere sentiment to bottom of box.
Cupcake Topper
1. Adhere gold pom-pom to toothpick.
2. Attach watermelon slice to toothpick.
3. Insert into cupcake.
***If you really want to make it all DIY, create a banner by die-cutting various sizes of circles from gold poster board and adhering them to a long piece of twine. Sups cute!***
Supplies for All Projects:
PL-001 Platinum Die Cutting and Embossing Machine or PE-100 Platinum 6 Machine
Spellbinder Dies:
S4-721 Market Fresh I’ll Have a Slice Etched Dies
S4-563 Shapeabilities Simply Said Phrase Set One Etched Dies
S4-114 Nestabilities Standard Circles Lg Etched Dies
SR-009 Contour Pillow Box Steel Rule Die
S4-728 Shapeabilities Market Fresh Bag n Tag It Etched Dies
Cardstock of Your Choice
Gold Poster Board
Adhesive of Your Choice
Foam Dots
Gold Pom-Pom Ball
Hot Glue and Glue Gun
Ink-Aqua
Mini Clothespin
Stamp Sentiment-Small
Toothpick
Water Brush
Watercolor Paint-Aqua
Watercolor Paper-140 lb. Cold Press
Thanks for joining me for this new series. Hope you will stop by again next month when I feature a baby shower theme!
XO,
Debi























































































1 comment
I love these, Debi! Such a fun and fresh idea!